
报错代码:
AMD 处理器在使用 KVM 开启虚拟机时可能会出现此类报错:
failed to set MSR 0xe1 to 0x0解决方法:
# echo Y > /sys/module/kvm/parameters/ignore_msrsAMD 处理器在使用 KVM 开启虚拟机时可能会出现此类报错:
failed to set MSR 0xe1 to 0x0# echo Y > /sys/module/kvm/parameters/ignore_msrs# /etc/init.d/vmware start
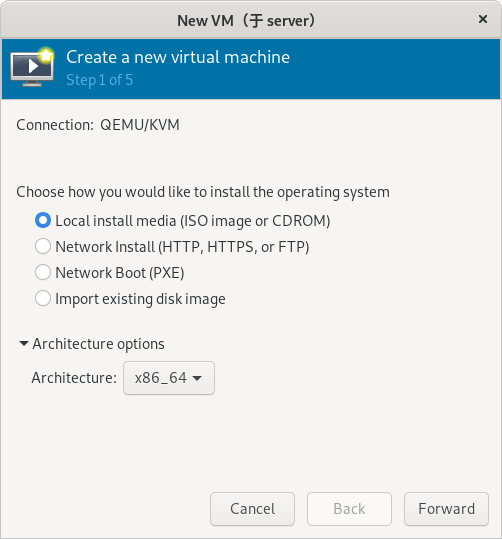
# vmplayer在创建 KVM 虚拟机之前要先安装 KVM 并创建 KVM 虚拟网络
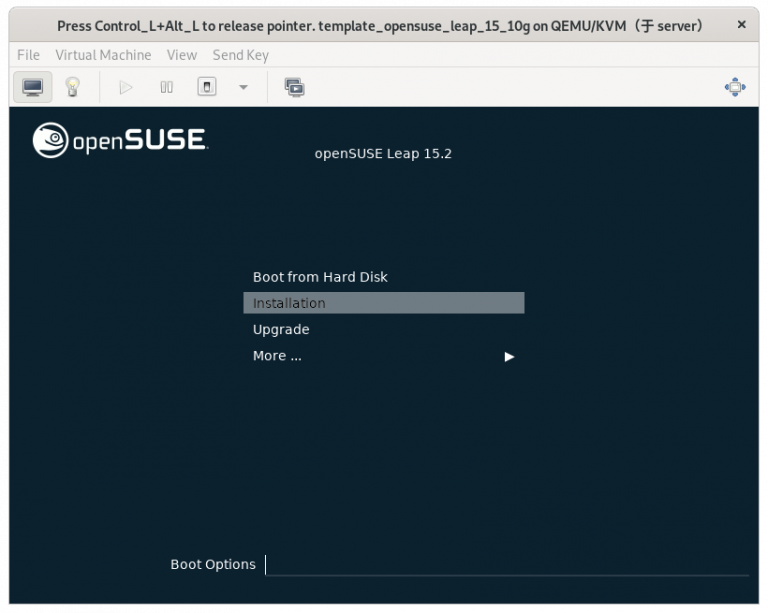
在 openSUSE 官网上下载安装系统所需要的镜像:
https://software.opensuse.org/distributions/leap
主要用于批量克隆出新的 KVM 机器,节约创建新虚拟机的时间
(只在真机上执行以下步骤)
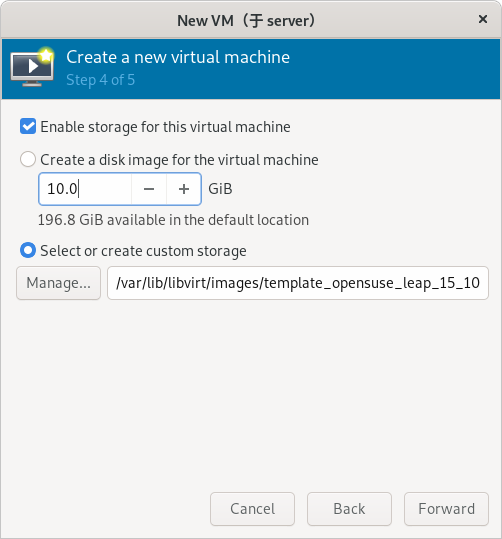
# qemu-img create -f qcow2 /var/lib/libvirt/images/template_opensuse_leap_15_10g.qcow2 10G(只在真机上执行以下步骤)
# ls /var/lib/libvirt/images/ | grep template_opensuse_leap_15_10g.qcow2(只在真机上执行以下步骤)
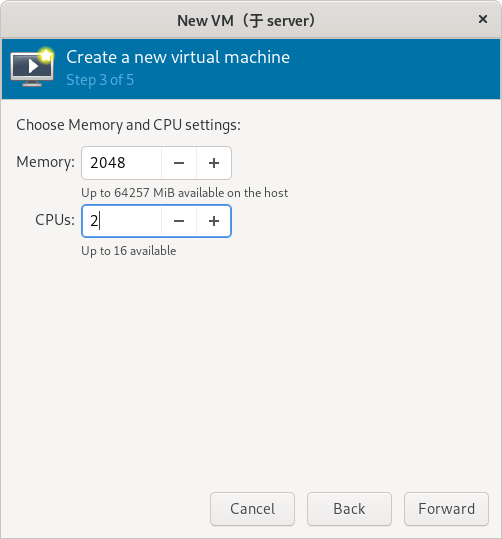
# virt-manager(只在真机上执行以下步骤)
(步骤略)
(只在真机上执行以下步骤)
(只在真机上执行以下步骤)

(只在真机上执行以下步骤)
(只在真机上执行以下步骤)
(只在真机上执行以下步骤)
(注意:虚拟网络必须提前创建好)
(只在真机上执行以下步骤)
(只在真机上执行以下步骤)

(只在真机上执行以下步骤)
(只在真机上执行以下步骤)
(只在真机上执行以下步骤)
(只在真机上执行以下步骤)
(只在真机上执行以下步骤)
(只在真机上执行以下步骤)

(只在真机上执行以下步骤)
(只在真机上执行以下步骤)

(只在真机上执行以下步骤)
(只在真机上执行以下步骤)
(只在真机上执行以下步骤)

(只在真机上执行以下步骤)
(只在真机上执行以下步骤)

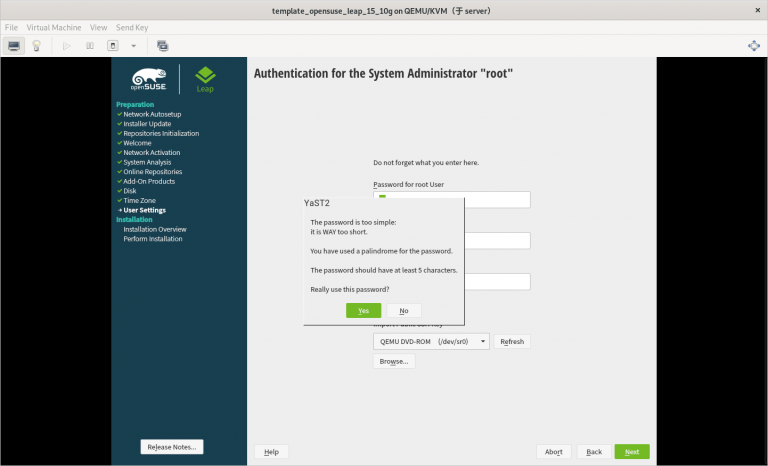
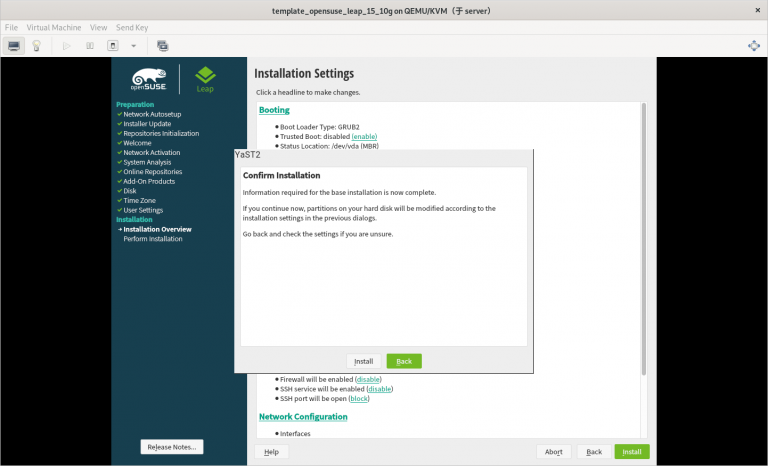
3.2.21 在安装系统的过程中需要注意的内容总结
1) 一定要使用刚刚创建的 template_opensuse_leap_15_10g.qcow2 作为安装虚拟机的硬件文件
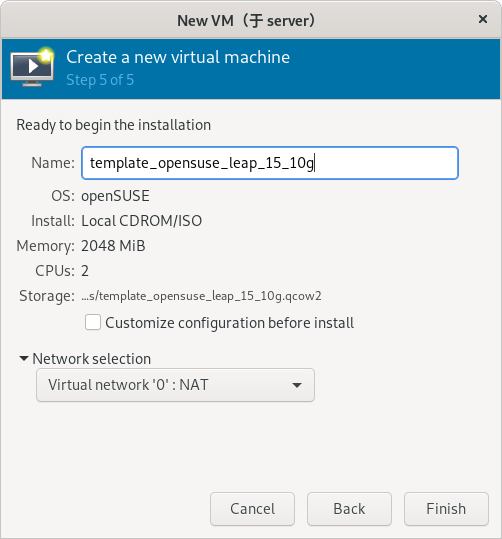
2) 虚拟机网络 “0” 要提前创建好
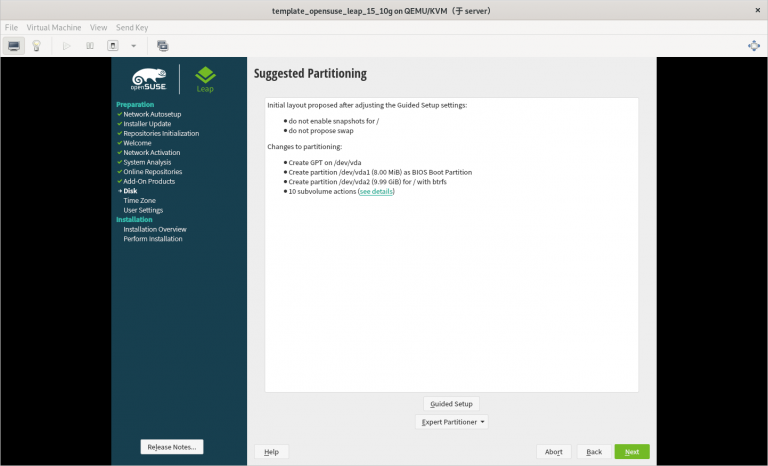
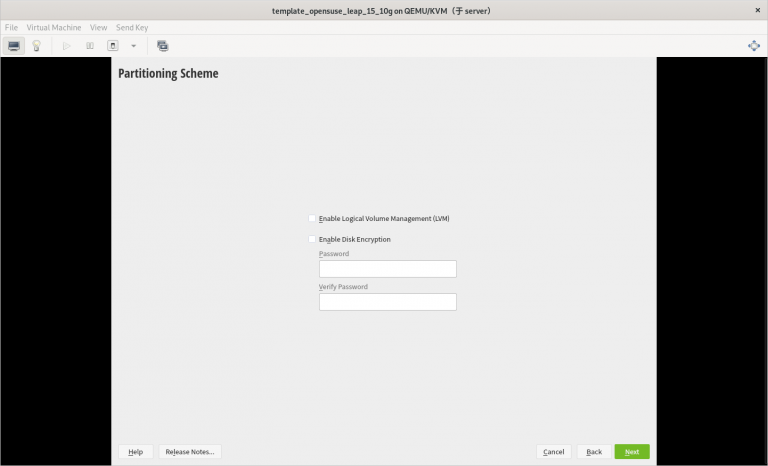
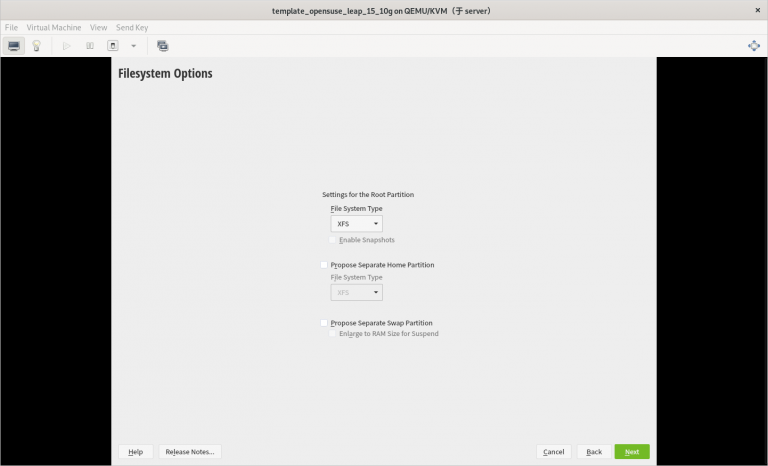
3) 只分一个分区,只设置一个挂载点挂载到根,使用标准硬盘,硬盘格式是 XFS
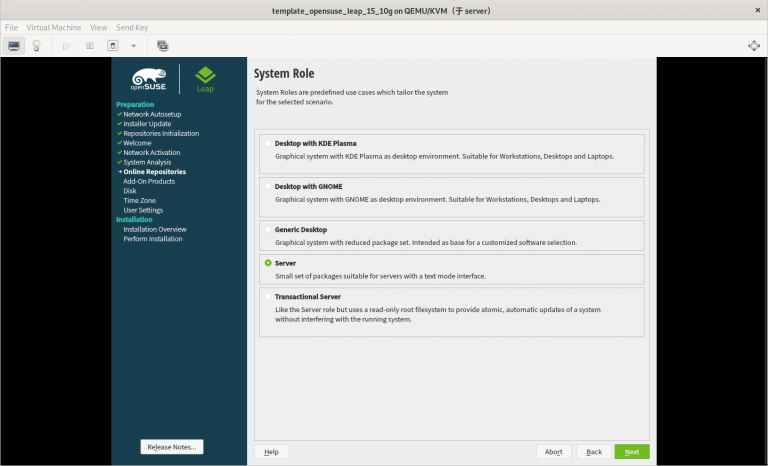
4) 选择最小化安装系统步骤四:进入新创建虚拟机修改配置
(只在虚拟机上执行以下步骤)
4.1 添加 Console 配置
4.1.1 修改 grub 内核配置文件
# vi /etc/default/grub
将全部内容修改如下:
# If you change this file, run 'grub2-mkconfig -o /boot/grub2/grub.cfg' afterwards to update
# /boot/grub2/grub.cfg.

# Uncomment to set your own custom distributor. If you leave it unset or empty, the default
# policy is to determine the value from /etc/os-release
GRUB_DISTRIBUTOR=
GRUB_DEFAULT=saved
GRUB_HIDDEN_TIMEOUT=0
GRUB_HIDDEN_TIMEOUT_QUIET=true
GRUB_TIMEOUT=8
GRUB_CMDLINE_LINUX_DEFAULT="splash=silent mitigations=auto quiet"
GRUB_SERIAL_COMMAND="serial --unit=1 --speed=115200"
GRUB_CMDLINE_LINUX="biosdevname=0 net.ifnames=0 console=tty0 console=ttyS0,115200n8"
GRUB_DISABLE_LINUX_UUID="true"
GRUB_ENABLE_LINUX_LABEL="true"
GRUB_DISABLE_RECOVERY="true"

# Uncomment to automatically save last booted menu entry in GRUB2 environment

# variable `saved_entry'
# GRUB_SAVEDEFAULT="true"
#Uncomment to enable BadRAM filtering, modify to suit your needs

# This works with Linux (no patch required) and with any kernel that obtains
# the memory map information from GRUB (GNU Mach, kernel of FreeBSD ...)
# GRUB_BADRAM="0x01234567,0xfefefefe,0x89abcdef,0xefefefef"
#Uncomment to disable graphical terminal (grub-pc only)

GRUB_TERMINAL="gfxterm"
# The resolution used on graphical terminal
#note that you can use only modes which your graphic card supports via VBE

# you can see them in real GRUB with the command `vbeinfo'
GRUB_GFXMODE="auto"
# Uncomment if you don't want GRUB to pass "root=UUID=xxx" parameter to Linux
# GRUB_DISABLE_LINUX_UUID=true
#Uncomment to disable generation of recovery mode menu entries

# GRUB_DISABLE_RECOVERY="true"
#Uncomment to get a beep at grub start

# GRUB_INIT_TUNE="480 440 1"
GRUB_BACKGROUND=
GRUB_THEME=/boot/grub2/themes/openSUSE/theme.txt
SUSE_BTRFS_SNAPSHOT_BOOTING="true"
GRUB_DISABLE_OS_PROBER="false"
GRUB_ENABLE_CRYPTODISK="n"
GRUB_CMDLINE_XEN_DEFAULT="vga=gfx-1024x768x16"
4.1.2 使修改的 grub 内核配置生效
# grub2-mkconfig -o grub
4.2 将系统自动挂载的硬盘从使用 uuid 换成硬件路径
4.2.1 查看根分区的 UUID
# blkid
/dev/vda1: UUID="53ee2f87-89b8-4cd7-a4dc-0957d28f4831" TYPE="xfs" PARTUUID="3d8377ef-01"
(补充:这里的 UUID 是: 53ee2f87-89b8-4cd7-a4dc-0957d28f4831)
4.2.2 在自动挂载文件里将根分区的 UUID 换成硬件路径
# vi /etc/fstab
将以下内容:
......
UUID=53ee2f87-89b8-4cd7-a4dc-0957d28f4831 /                   xfs     defaults        0 0
(补充:这里的 UUID 是: 53ee2f87-89b8-4cd7-a4dc-0957d28f4831)
修改为:
/dev/vda1 / xfs defaults 0 0
4.3 删除不用的软件
# zypper -n rm firewalld-*
4.4 进行分区扩展
4.4.1 安装分区扩展软件
# zypper -n in growpart
4.4.2 给开机自启配置文件相应的权限
# chmod 755 /root/growpart.sh
4.4.3 设置开机自动扩容根目录
4.4.3.1 让 systemctl 管理 /root/growpart.sh 脚本
4.4.3.1.1 创建 systemctl 管理 /root/growpart.sh 脚本的配置文件
# vim /etc/systemd/system/growpart.service
创建以下内容:
[Unit]
Description=growpart
After=default.target
[Service]
Type=oneshot
ExecStart=/root/growpart.sh
[Install]
WantedBy=default.target
4.4.3.1.2 让 systemctl 管理 /root/growpart.sh 脚本
# systemctl daemon-reload
4.4.3.2 设置开机自动扩容根目录
# systemctl enable --now growpart.service
4.5 只使用本地软件源(选做)
4.5.1 禁用所有软件源(选做)
# zypper mr -da
4.5.2 添加本地软件源(选做)
# zypper ar -fcg http://10.0.0.254/openSUSE-Leap-15/ lan
(注意: http://10.0.0.254/openSUSE-Leap-15/ 需要根据真实环境的情况进行更改)
4.5.3 添加本地软件源(选做)
# zypper ref
4.6 修改虚拟机系统的名称
# hostnamectl set-hostname template_opensuse_leap_15_10g
4.7 启用 serial 服务实现通过 virsh console 命令控制虚拟机
# systemctl start serial-getty@ttyS0
# systemctl enable serial-getty@ttyS0
4.8 清除虚拟系统的历史命令
# history -c
4.9 关闭虚拟机
# poweroff
步骤五:此时就可以将此虚拟机的硬件文件作为模板进行批量克隆虚拟机了
(只在真机上执行以下步骤)(只在真机上执行以下步骤)
1) 一定要使用刚刚创建的 template_opensuse_leap_15_10g.qcow2 作为安装虚拟机的硬件文件
2) 虚拟机网络 “0” 要提前创建好
3) 只分一个分区,只设置一个挂载点挂载到根,使用标准硬盘,硬盘格式是 XFS
4) 选择最小化安装系统
(只在虚拟机上执行以下步骤)
# vi /etc/default/grub将全部内容修改如下:
# If you change this file, run 'grub2-mkconfig -o /boot/grub2/grub.cfg' afterwards to update
# /boot/grub2/grub.cfg.
# Uncomment to set your own custom distributor. If you leave it unset or empty, the default
# policy is to determine the value from /etc/os-release
GRUB_DISTRIBUTOR=
GRUB_DEFAULT=saved
GRUB_HIDDEN_TIMEOUT=0
GRUB_HIDDEN_TIMEOUT_QUIET=true
GRUB_TIMEOUT=8
GRUB_CMDLINE_LINUX_DEFAULT="splash=silent mitigations=auto quiet"
GRUB_SERIAL_COMMAND="serial --unit=1 --speed=115200"
GRUB_CMDLINE_LINUX="biosdevname=0 net.ifnames=0 console=tty0 console=ttyS0,115200n8"
GRUB_DISABLE_LINUX_UUID="true"
GRUB_ENABLE_LINUX_LABEL="true"
GRUB_DISABLE_RECOVERY="true"
# Uncomment to automatically save last booted menu entry in GRUB2 environment
# variable `saved_entry'
# GRUB_SAVEDEFAULT="true"
#Uncomment to enable BadRAM filtering, modify to suit your needs
# This works with Linux (no patch required) and with any kernel that obtains
# the memory map information from GRUB (GNU Mach, kernel of FreeBSD ...)
# GRUB_BADRAM="0x01234567,0xfefefefe,0x89abcdef,0xefefefef"
#Uncomment to disable graphical terminal (grub-pc only)
GRUB_TERMINAL="gfxterm"
# The resolution used on graphical terminal
#note that you can use only modes which your graphic card supports via VBE
# you can see them in real GRUB with the command `vbeinfo'
GRUB_GFXMODE="auto"
# Uncomment if you don't want GRUB to pass "root=UUID=xxx" parameter to Linux
# GRUB_DISABLE_LINUX_UUID=true
#Uncomment to disable generation of recovery mode menu entries
# GRUB_DISABLE_RECOVERY="true"
#Uncomment to get a beep at grub start
# GRUB_INIT_TUNE="480 440 1"
GRUB_BACKGROUND=
GRUB_THEME=/boot/grub2/themes/openSUSE/theme.txt
SUSE_BTRFS_SNAPSHOT_BOOTING="true"
GRUB_DISABLE_OS_PROBER="false"
GRUB_ENABLE_CRYPTODISK="n"
GRUB_CMDLINE_XEN_DEFAULT="vga=gfx-1024x768x16"(只在虚拟机上执行以下步骤)
# grub2-mkconfig -o grub(只在虚拟机上执行以下步骤)
# blkid
/dev/vda1: UUID="53ee2f87-89b8-4cd7-a4dc-0957d28f4831" TYPE="xfs" PARTUUID="3d8377ef-01"(补充:这里的 UUID 是: 53ee2f87-89b8-4cd7-a4dc-0957d28f4831)
(只在虚拟机上执行以下步骤)
# vi /etc/fstab将以下内容:
......
UUID=53ee2f87-89b8-4cd7-a4dc-0957d28f4831 / xfs defaults 0 0(补充:这里的 UUID 是: 53ee2f87-89b8-4cd7-a4dc-0957d28f4831)
修改为:
......
/dev/vda1 / xfs defaults 0 0(只在虚拟机上执行以下步骤)
# zypper -n rm firewalld-*(只在虚拟机上执行以下步骤)
# zypper -n in growpart(只在虚拟机上执行以下步骤)
# chmod 755 /root/growpart.sh(只在虚拟机上执行以下步骤)
# vim /etc/systemd/system/growpart.service创建以下内容:
[Unit]
Description=growpart
After=default.target

[Service]
Type=oneshot
ExecStart=/root/growpart.sh

[Install]
WantedBy=default.target(只在虚拟机上执行以下步骤)
# systemctl daemon-reload(只在虚拟机上执行以下步骤)
# systemctl enable --now growpart.service(只在虚拟机上执行以下步骤)
# zypper mr -da(只在虚拟机上执行以下步骤)
# zypper ar -fcg http://10.0.0.254/openSUSE-Leap-15/ lan(注意: http://10.0.0.254/openSUSE-Leap-15/ 需要根据真实环境的情况进行更改)
(只在虚拟机上执行以下步骤)
# zypper ref(只在虚拟机上执行以下步骤)
# hostnamectl set-hostname template_opensuse_leap_15_10g(只在虚拟机上执行以下步骤)
# systemctl start serial-getty@ttyS0
# systemctl enable serial-getty@ttyS0(只在虚拟机上执行以下步骤)
# history -c(只在虚拟机上执行以下步骤)
# poweroff(只在真机上执行以下步骤)
1) 一台可以联接公网的电脑
2) 一个 CentOS 8.2 系统的安装 U 盘
3) 一台可以联接公网并且有公网 IP 地址的 VPS
4) 一个可以联接公网并使用 SSH 和 VNC 的客户端
1) 电脑通过 SSH 建立联接到 VPS 的隧道,此操作会占用 VPS 的一个端口
2) VPS 通过 SSH 将联接电脑的隧道端口映射到一个新的端口
3) 客户端通过 SSH 联接到 VPS 映射出来的新端口,通过 SSH 或远程桌面使用虚拟化平台
4) 客户端和电脑如果在同一内网里则可以通过 Samba 互传数据
(只在电脑上执行以下步骤)
(步骤略)
(
补充:
安装系统时可选择以下选项:
1) 系统起动方式:BIOS
2) Keyboard:English(US)
3) Language Support:English(United States)
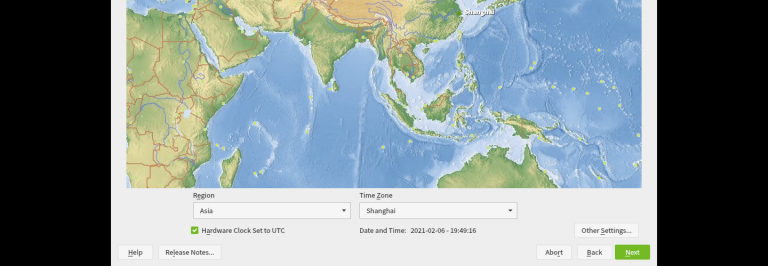
4) Time & Date:Asia/ShangHai
5) Installation Source:Local media
6) Software Selection:Minial Install
7) Installation Destination:将主硬盘里的所有空间都分配给根分区
8) KDUMP:Kdump is disabled
9) Network & Host Name:开启网络联接并设置好固定 DNS
10) SECURITY POLICY:No controller found
)
(这里以将 IP 地址设置为固定 IP 地址 192.168.0.1,DNS 设置为固定 DNS 8.8.8.8 为例)
(只在电脑上执行以下步骤)
# yum groupinstall -y "Server with GUI"(只在电脑上执行以下步骤)
# yum -y install langpacks-zh_CN(只在电脑上执行以下步骤)
# locale -a(只在电脑上执行以下步骤)
# yum -y install ibus ibus-libpinyin(分别在电脑、VPS 和客户端上执行以下步骤)
# useradd zhumingyu(补充:这里创建用户 zhumingyu 为例)
(分别在电脑、VPS 和客户端上执行以下步骤)
# passwd zhumingyu(补充:这里创建用户 zhumingyu 为例)
(分别在电脑和 VPS 上执行以下步骤)
# sysctl -w kernel.watchdog_thresh=60(只在电脑上执行以下步骤)
# vim /etc/sysctl.conf添加以下内容:
......
kernel.watchdog_thresh=60(只在电脑上执行以下步骤)
# sysctl -p(只在电脑上执行以下步骤)
# echo 1 > /proc/sys/kernel/softlockup_panic(分别在电脑和 VPS 上执行以下步骤)
# vim /etc/sysconfig/network-scripts/ifcfg-enp9s0添加以下内容:
......
PEERDNS=no
PEERROUTES=no
(补充:这里的 ifcfg-enp9s0 是指网卡对应的配置文件,不同的网卡对应的配置文件不同,这里以网卡名 ifcfg-enp9s0 为例,需要给所有网卡添加此参数,这一步也可以在系统图形系统桌面上设置)
(分别在电脑和 VPS 上执行以下步骤)
# systemctl restart NetworkManager(只在电脑上执行以下步骤)
(分别在电脑和 VPS 上执行以下步骤)
# vim /etc/ssh/sshd_config将以下内容:
......
#ClientAliveInterval 0
#ClientAliveCountMax 3
......
修改为:
......
ClientAliveInterval 60
ClientAliveCountMax 525600
......
(补充:这样设置会让 SSH 服务端每 60s 就会尝试连接一次客户端,如果 525600 次后没有回应,则断开)
(分别在电脑和 VPS 上执行以下步骤)
# vim /etc/bashrc添加以下内容:
......
export TMOUT=0
# vim /etc/profile添加以下内容:
......
export TMOUT=0(分别在电脑和 VPS 上执行以下步骤)
# source /etc/bashrc
# source /etc/profile(步骤略)
(只在电脑上执行以下步骤)
# yum -y install qemu-kvm libvirt-daemon libvirt-client libvirt-daemon-driver-qemu virt-install virt-manager virt-viewer virt-v2v(只在电脑上执行以下步骤)
# yum -y install samba
(只在电脑上执行以下步骤)
# vim /etc/samba/smb.conf将全部内容修改如下:
# See smb.conf.example for a more detailed config file or
# read the smb.conf manpage.
# Run 'testparm' to verify the config is correct after
# you modified it.

[global]
workgroup = WORKGROUP
realm = zhumingyu
netbios name = zhumingyu
#encrypt passwords = yes
map to guest = NEVER
security = user
password server = *
name resolve order = bcast host
restrict anonymous = 2
#null passwords = no
#guest account = smb_nobody
#use spnego = yes
client use spnego = yes
server string = ""
host msdfs = no
msdfs root = no
domain master = no
preferred master = no
local master = no
os level = 0
browse list = no
browseable = no
dns proxy = no
wide links = no
public= no
guest ok = no
hosts deny = ALL EXCEPT 192.168.0.2

[share]
valid users = zhumingyu
write list = zhumingyu
read list = zhumingyu
path = /share
guest ok = no
read only = no
browseable = no
writable = yes
public = no
create mask = 0755
directory mask = 0755
(
补充:
1) 这里以 Samba 服务器的 IP 地址是 192.168.0.1 为例
2) 这里的 workgroup = WORKGROUP 是让 Samba 服务属于 WORKGROUP
3) 这里的 hosts deny = ALL EXCEPT 192.168.0.2 是只让客户端 192.168.0.3 能够访问服务端的 Samba
4) 这里的 sharetest 是这个 Samba 挂载点的名称,挂载这个挂载点的格式就是://192.168.0.1/share
5) 这里的 valid users = zhumingyu 是 Samba 服务共享用户需要手动生成
6) 这里的 path = /share 是 Samba 服务共享目录需要手动生成
)
(只在电脑上执行以下步骤)
# smbpasswd -a zhumingyu(补充:这里以用户 zhumingyu 为例)
(只在电脑上执行以下步骤)
# pdbedit -L(只在电脑上执行以下步骤)
# mkdir /share(只在电脑上执行以下步骤)
# chmod 755 /share/(只在电脑上执行以下步骤)
# chown zhumingyu:zhumingyu /share/(补充:这里以用户 zhumingyu 为例)
(只在电脑上执行以下步骤)
# semanage fcontext -a -t samba_share_t '/share(/.*)?'(只在电脑上执行以下步骤)
# restorecon -RFvv /share/(只在电脑上执行以下步骤)
# systemctl enable --now smb(只在电脑上执行以下步骤)
# firewall-cmd --add-service=samba --permanent(只在电脑上执行以下步骤)
# firewall-cmd --reload(只在电脑上执行以下步骤)
# yum -y install tigervnc tigervnc-server(只在电脑上执行以下步骤)
# su - zhumingyu(补充:这里以用户 zhumingyu 为例)
(只在电脑上执行以下步骤)
$ vncpasswd(只在电脑上执行以下步骤)
$ exit(只在电脑上执行以下步骤)
# su - zhumingyu(补充:这里以用户 zhumingyu 为例)
(只在电脑上执行以下步骤)
$ vim ~/vnc.sh创建以下内容:
#!/bin/bash

vncserver -list | grep :1 &> /dev/null || vncserver :1 -localhost -nolisten tcp
(补充:此命令会检查 vncserver :1 会话是否存在,如果不存在,就以禁止非安全远程登陆的方式创建一个)
(只在电脑上执行以下步骤)
$ exit(只在电脑上执行以下步骤)
# vim /etc/rc.local添加以下内容:
......
su - zhumingyu -c '/home/zhumingyu/vnc.sh'
(补充:这里以用户 zhumingyu 的身份运行)
或者:
......
su - zhumingyu -c 'vncserver -list | grep :1' &> /dev/null || su - zhumingyu -c 'vncserver :1 -localhost -nolisten tcp'
(
补充:
1) 如果前面没有创建脚本的话,可以只添加上面“或者”后面的这一行
2) 以用户 zhumingyu 的身份运行
3) 此命令会检查 vncserver :1 会话是否存在,如果不存在,就以禁止非安全远程登陆的方式创建一个
)
(只在电脑上执行以下步骤)
# chmod u+x /home/zhumingyu/vnc.sh# su - zhumingyu(补充:这里以用户 zhumingyu 为例)
(只在电脑上执行以下步骤)
$ crontab -e添加以下内容:
......
0 */1 * * * /home/zhumingyu/vnc.sh
或者:
......
0 */1 * * * vncserver -list | grep :1' &> /dev/null || su - zhumingyu -c 'vncserver :1 -localhost -nolisten tcp
(
补充:
1) 这里以用户 zhumingyu 的身份运行
2) 如果前面没有创建脚本的话,可以只添加上面“或者”后面的这一行
3) 此命令会检查 vncserver :1 会话是否存在,如果不存在,就以禁止非安全远程登陆的方式创建一个
)
(只在电脑上执行以下步骤)
$ exit(分别在电脑、VPS 和客户端上执行以下步骤)
# su - zhumingyu(补充:这里以用户 zhumingyu 为例)
(分别在电脑、VPS 和客户端上执行以下步骤)
$ ssh-keygen -b 2048 -t rsa(补充:建议在创建 SSH 密钥时为 SSH 密钥添加一个密码)
(分别在电脑、VPS 和客户端上执行以下步骤)
$ exit(分别在电脑、VPS 和客户端上执行以下步骤)
# su - zhumingyu(补充:这里以用户 zhumingyu 为例)
(只在电脑上执行以下步骤)
$ ssh-copy-id <public IP address of VPS>(只在 VPS 上执行以下步骤)
$ ssh-copy-id localhost$ ssh-copy-id <IP address of computer>
$ ssh-copy-id <public IP address of VPS>(分别在电脑、VPS 和客户端上执行以下步骤)
$ exit(只在电脑上执行以下步骤)
# su - zhumingyu(补充:这里以用户 zhumingyu 为例)
(只在电脑上执行以下步骤)
$ vim ~/ssh.sh创建以下内容:
ps -aux | grep -v grep | grep "11000:localhost:22 <IP address of computer>" &> /dev/null || ssh -X -fCNR 11000:localhost:22 <IP address of computer>(
补充:
1) 这里以用户 zhumingyu 的身份运行
2) 如果 11000 端口没有影射到 22 端口则影射
)
(只在电脑上执行以下步骤)
$ exit(只在电脑上执行以下步骤)
# vim /etc/rc.local添加以下内容:
......
su - zhumingyu -c '/home/zhumingyu/ssh.sh'
(补充:这里以用户 zhumingyu 的身份运行)
或者:
......
ps -aux | grep -v grep | grep "11000:localhost:22 <IP address of computer>" &> /dev/null || su - zhumingyu -c 'ssh -X -fCNR 11000:localhost:22 <IP address of computer>'
(
补充:
1) 如果前面没有创建脚本的话,可以只添加上面“或者”后面的这一行
2) 这里以用户 zhumingyu 的身份运行
3) 如果 11000 端口没有影射到 22 端口则影射
)
(只在电脑上执行以下步骤)
# chmod +x /etc/rc.local(只在电脑上执行以下步骤)
# su - zhumingyu(补充:这里以 zhumingyu 为例)
(只在电脑上执行以下步骤)
$ crontab -e添加以下内容:
......
0 */1 * * * /home/zhumingyu/ssh.sh
或者:
......
0 */1 * * * ps -aux | grep -v grep | grep "11000:localhost:22 <IP address of computer>" &> /dev/null || ssh -X -fCNR 11000:localhost:22 <IP address of computer>
(补充:如果 11000 端口影射到 22 端口则影射)
(只在电脑上执行以下步骤)
$ exit(只在 VPS 上执行以下步骤)
# su - zhumingyu(补充:这里以用户 zhumingyu 为例)
(只在 VPS 上执行以下步骤)
$ vim ~/sshd.sh创建以下内容:
#!/bin/bash

ps -aux | grep -v grep | grep "*:10000:localhost:11000 localhost" || ssh -X -fCNL *:10000:localhost:11000 localhost
(补充:如果 11000 端口没有影射成 10000 端口则影射)
(只在 VPS 上执行以下步骤)
$ exit(只在 VPS 上执行以下步骤)
# vim /etc/rc.local添加以下内容:
......
su - zhumingyu -c '/home/zhumingyu/sshd.sh'
(补充:这里以用户 zhumingyu 为例)
或者:
......
ps -aux | grep -v grep | grep "*:10000:localhost:11000 localhost" || su - zhumingyu -c 'ssh -X -fCNL *:10000:localhost:11000 localhost'
(
补充:
1) 如果前面没有创建脚本的话,可以只添加上面“或者”后面的这一行
2) 以用户 zhumingyu 的身份运行
3) 如果 11000 端口没有影射成 10000 端口则影射
)
(只在 VPS 上执行以下步骤)
# chmod +x /etc/rc.local(只在 VPS 上执行以下步骤)
# su - zhumingyu(补充:这里以用户 zhumingyu 为例)
(只在 VPS 上执行以下步骤)
$ crontab -e添加以下内容:
......
0 */1 * * * /home/zhumingyu/sshd.sh
或者:
......
0 */1 * * * ps -aux | grep -v grep | grep "*:10000:localhost:11000 localhost" || ssh -X -fCNL *:10000:localhost:11000 localhost
(
补充:
1) 如果前面没有创建脚本的话,可以只添加上面“或者”后面的这一行
2) 如果 11000 端口没有影射成 10000 端口则影射
)
(只在 VPS 上执行以下步骤)
$ exit(只在 VPS 上执行以下步骤)
# firewall-cmd --add-port=10000/tcp --permanent(补充:这里打开的端口号,是根据前面的设置而定的)
(只在 VPS 上执行以下步骤)
# firewall-cmd --reload(分别在电脑和 VPS 上执行以下步骤)
# vim /etc/ssh/sshd_config将以下内容:
......
PermitRootLogin no
......
修改为:
......
PermitRootLogin yes
......(分别在电脑和 VPS 上执行以下步骤)
# vim /etc/ssh/sshd_config将以下内容:
......
# PasswordAuthentication yes
......
修改为:
......
PasswordAuthentication no
......(只在客户端上执行以下步骤)
# ssh -X -p <SSH non standard port number> <user of computer>@<public IP address of VPS>(
补充:
1) 如果按照前面的步骤操作,这里的 VPS 每小时会生成一个新的 SSH 非标准端口号以用于联接电脑,比如说现在是 14 点,那就会自动生成一个 11014 的 SSH 非标准端口号
2) 如果按照前面的步骤操作,这里的用户是 zhumingyu
)
(只在客户端上执行以下步骤)
# ssh -X <user of computer>@<IP address of computer>(
补充:
1) 如果按照前面的步骤操作,这里的用户用户是 zhumingyu
2) 如果按照前面的步骤操作,这里的电脑的 IP 地址是 192.168.0.1
)
(只在客户端上执行以下步骤)
# ssh -X -p <SSH non standard port number> <user of computer>@<public IP address of VPS>(
补充:
1) 如果按照前面的步骤操作,这里的 VPS 每小时会生成一个新的 SSH 非标准端口号以用于联接电脑,比如说现在是 14 点,那就会自动生成一个 11014 的 SSH 非标准端口号
2) 如果按照前面的步骤操作,这里的用户用户是 zhumingyu
)
(只在客户端上执行以下步骤)
# virt-manager(注意:网络带宽很小则远程桌面会比较卡,建议电脑、客户端和 VPS 的带宽 2m 以上)
(只在客户端上执行以下步骤)
# ssh -X <user of computer>@<IP address of computer>(
补充:
1) 如果按照前面的步骤操作,这里的用户用户是 zhumingyu
2) 如果按照前面的步骤操作,这里的电脑的 IP 地址是 192.168.0.1
)
(只在客户端上执行以下步骤)
# virt-manager(注意:网络带宽很小则远程桌面会比较卡,建议电脑、客户端和 VPS 的带宽 2m 以上)
(只在客户端上执行以下步骤)
# ssh -p <SSH non standard port number> -L <port number of VNC>:localhost:<port number of VNC> -l <user of computer> <public IP address of VPS>(
补充:
1) 如果按照前面的步骤操作,这里的 VPS 每小时会生成一个新的 SSH 非标准端口号以用于联接电脑,比如说现在是 14 点,那就会自动生成一个 11014 的 SSH 非标准端口号
2) 如果按照前面的步骤操作,这里的 VNC 的端口号是 5901
3) 如果按照前面的步骤操作,这里的电脑的用户用户是 zhumingyu
)
另开启一个命令行终端:
# vncviewer localhost :<number of VNC service>(补充:如果按照前面的步骤操作,这里的 VNC 服务的编号是 1)
(注意:网络带宽很小则远程桌面会比较卡,建议电脑、客户端和 VPS 的带宽 2m 以上)
(只在客户端上执行以下步骤)
# vncviewer -via <user of computer>@<IP address of computer> localhost :<number of VNC service>(
补充:
1) 如果按照前面的步骤操作,这里的电脑的用户是 zhumingyu
2) 如果按照前面的步骤操作,这里的电脑的 IP 地址是 192.168.0.1
3) 如果按照前面的步骤操作,这里的 VNC 服务的编号是 1
)
(只在客户端上执行以下步骤)
在文件目录下栏输入以下内容:
\\<IP address of computer>\<samba directory>(
补充:
1) 如果按照前面的步骤操作,这里的电脑的 IP 地址是 192.168.0.1
2) 如果按照前面的步骤操作,这里的 Samba 项目是 share
)
(
注意:
1) 如果按照前面的步骤操作,只有 IP 地址是 192.168.0.2 和 192.168.0.3 的客户端才能够执行以上步骤
2) Windows 客户端建议安装 SecureCRT、Xmanager 和 VNC 客户端以实现 ssh、ssh 调用 virt-manager 和 VNC
)
(只在客户端上执行以下步骤)
在文件 –> 其他位置 –> 连接到服务器的地址栏里输入以下内容:
smb://<IP address of computer>/<samba directory>(
补充:
1) 如果按照前面的步骤操作,这里的电脑的 IP 地址是 192.168.0.1
2) 如果按照前面的步骤操作,这里的 Samba 项目是 share
)
(注意:如果按照前面的步骤操作,只有 IP 地址是 192.168.0.2 和 192.168.0.3 的客户端才能够执行以上步骤)
网关路由器拥有 IP 地址(可以通过给宽带申请公网 IP 地址并将光纤盒设置为桥接模式,在路由器上添加用户和密码实现)
(步骤略)
由于大多数的公网 IP 地址都是动态,定期会变,所以可以通过此方法知道近期的公网 IP 地址是多少
(只在电脑上执行以下步骤)
# su - zhumingyu(补充:这里以用户 zhumingyu 为例)
(只在电脑上执行以下步骤)
$ vim /root/computerip.sh创建以下内容:
#!/bin/bash

computerip=`curl ifconfig.me`
domain=<public IP address of VPS>

ssh athenadb.com \"echo `curl ifconfig.me` > /home/zhumingyu/serverip.txt\"
(补充:将电脑的公网 IP 地址拷贝到 VPS 的 /tmp/computerip.txt 文件里为例)
(只在电脑上执行以下步骤)
$ exit(只在电脑上执行以下步骤)
# su - zhumingyu(补充:这里以用户 zhumingyu 为例)
(只在电脑上执行以下步骤)
$ crontab -e添加以下内容:
......
0 */10 * * * /home/zhumingyu/.crontab/computerip.txt
或者:
......
ssh <public IP address of VPS> \"echo `curl ifconfig.me` > /home/zhumingyu/serverip.txt\"
(
补充:
1) 如果前面没有创建脚本的话,可以只添加上面“或者”后面的这一行
2) 将电脑的公网 IP 地址拷贝到 VPS 的 /home/zhumingyu/serverip.txt 文件里
)
(只在电脑上执行以下步骤)
$ exit由于大多数的公网 IP 地址都是动态,定期会变,所以可以通过此方法知道近期的公网 IP 地址是多少
(步骤略)
在 VMware 的官网上下载软件 VMware Workstation Player(本次使用的是 VMware-Player-15.5.6-16341506.x86_64.bundle):
服务器系统要配置好可用的软件源
# yum -y install perl gcc kernel-devel libX11 libXinerama libXcursor libXtst elfutils-libelf-devel# chmod u+x VMware-Player-15.5.6-16341506.x86_64.bundle(补充:本次添加权限的是 VMware-Player-15.5.6-16341506.x86_64.bundle)
# ./VMware-Player-15.5.6-16341506.x86_64.bundle(补充:本次安装的是 VMware-Player-15.5.6-16341506.x86_64.bundle)